Introduction: In
this article I will explain how we can enable Code First migration in asp.net MVC 4
Description:
In the previous article I have explained Create, Read, Update and Delete in Asp.net with MVC 4 Razor view Engine using Entity framework with Code first approach, How to integrate Captcha in asp.net,What is Scaffolding in Asp.net MVC?, How to create Contact Us page in Asp.net and What is Asp.net MVC? Its advantages and disadvantges.
Migration is used to backup our database when we are going
to develop application using code first approach in asp.net MVC.
I have a class named Student_Detail.cs
in Models:
public class Student_Detail
{
public int Id { get; set; }
public string Name { get; set; }
public string Subject { get; set; }
public int Marks { get; set; }
}
public class Student_Detail
{
public int Id { get; set; }
public string Name { get; set; }
public string Subject { get; set; }
public int Marks { get; set; }
public string Address { get; set; }
}
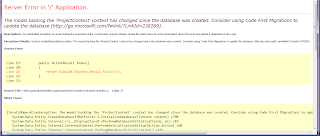
Build the project and run the application. You got an
Exception:
“The model
backing the 'ProjectContext' context has changed since the database was
created. Consider using Code First Migrations to update the database
(http://go.microsoft.com/fwlink/?LinkId=238269).”
See attached snapshot:
If you see exception/error carefully it suggests the solution:
Use Code First Migrations to update
the database
Step 1: To update database
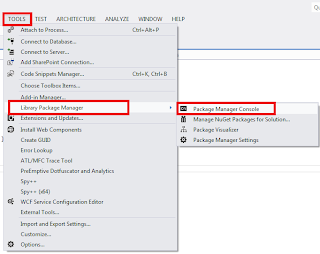
using Code first Migration go to Tools>>Library
Package Manager >> Package Manager Console as shown in snapshot:
Package Manager Console will be open and type the given
command:
enable-migrations
Hit the
enter button. It will show output of all context you have in project. Copy the
context for that you want to enable migration. Here I run the following
command:
PM> Enable-Migrations -ContextTypeName
MVCAPPLICATION.Models.ProjectContext
As command
execute it will show you enabled message for context as show in attached
snapshot:
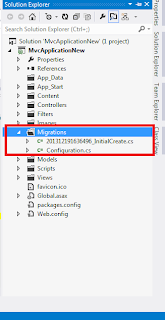
It will
create Migration folder in project
with configuration.cs (seed method)
and InitialCreate target migration
(up and down methods) see attached snapshot:
(Click to enlarge)
Step
2: After that in
configuration.cs file change the AutomaticMigrationsEnabled to true:
public Configuration()
{
AutomaticMigrationsEnabled = true;
}
Step
3: open Global.asax file and add the namespace:
using MVCAPPLICATION.Models;
using System.Data.Entity;
Add the given
code to Application_Start in
Global.asax file:
Database.SetInitializer<ProjectContext>(null);
Step 4: Run the command in Package Manager Console:
update-database
Now you see a column has been added to table in database.
Add the column in views files or add a new Controller. Run the application and
see the result.
I hope this article helps you to use code first Migration to update the database.


.png)


No comments:
Post a Comment