Introduction: In this post I will explain how we can install
the Wordpress on Localhost (Wamp Server).
Description:
1.
Download the Wamp Server from as below mention
link:
After completion of Download install the
WampServer. Now you see a folder name Wamp self created in Local Disk C. Double
click on folder you see the structure as shown in below attached snapshot:
2.
Download the latest version of Wordpress from
below mention link:
3.
After that go to Local Disk C>>Wamp>>WWW.
Create a new folder and paste all copied files of Wordpress. Here I create a folder name Test Project.
Create a new folder and paste all copied files of Wordpress. Here I create a folder name Test Project.
4.
Now start the Wamp Server. When Wamp server icon
become green, click on it. Select Localhost, by default selected browser will
open as see the attached snapshot:
5.
Now once again click on wamp icon and select Phpmydmin.
New window will be open see the attached snapshot.
Create database for project. Here I create
Test_Project Database.
7.
Click on Test Project folder that will redirect
you to next page to Create Configuration File see the attached snapshot below.
Click on Create a Configuration File.
Note:
You can also create Configuration file manually. In Wordpress folder you see a wp-config-sample.php file. Open
it and enter your information i.e.
Database name, Database Username and Password information. After that save
it as wp-config.php file.
8.
Your will be redirect to next page see the
snapshot:
Click on Let’s go.
9.
After that you will be redirect to next page
where you have to enter the Database connection information i.e. Database name,
Username, Password, Database Host and Table Prefix. See the attached snapshot.
Here I enter the Database name Test_Project, User name root, keep password textbox empty,
Database Host localhost and keep
Table Prefix wp_ as mention in below attached snapshot.
Note: when install Wordpress on localhost
keep password textbox empty and enter username “root”.
10.
Click on submit button, you will be redirect to
next page see the attached snapshot.
Click on Run the install button.
11.
After that on next page enter site title,
username, password and email information. As mention in attached snapshot.
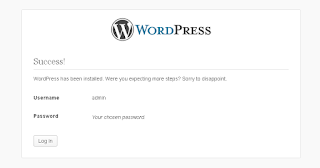
You have done it. You get a successful
installation message as check the attached snapshot.
Click on log in button and enter Username and Password to login Admin panel.
If yes post your comment to admire my work. You can like me on Facebook, Google+, Linkedin and Twitter via hit on Follow us Button and also can get update follow by Email.
Click on log in button and enter Username and Password to login Admin panel.


.png)


Do you want to gain a little closet or floor space in your
ReplyDeletenext home improvement project? Relocate your water heater to your
attic! Modern water heaters are produced in efficient, reliable
"low-boy" designs that you can tuck safely between your ceiling and your roof.
This allows you to gain a little extra storage space.
My web site - gutter cleaning Portland